Horstman MDC Clutch |
The following instructions have been prepared to help you obtain the maximum performance and value from your clutch. Please read carefully before installing the clutch.
MODEL SELECTION:
The MDC disc clutch for racing 4 cycle karting is available with 4 springs or 6 springs in order to adapt to virtually every class offered. Many of the components are interchangeable between the various models in order to make the MDC more versatile.
Model MDC-444 (4 spring)
Designed for use in restricted stock, stock, and superstock.
Model MDC-400S (6 spring)
Designed for use in stock, superstock, cage karts stock, heavyweight classes.
Model MDC-400M (6 spring)
Designed for use in modified classes.
Choosing the wrong model clutch will result in failure to obtain the correct stall speed as well as poor performance or damage to clutch.
THEORY OF OPERATION:
The Horstman MDC clutch operates automatically by centrifugal force to transmit the engines torque to the axle. The compression springs in the clutch can be adjusted to counteract the centrifugal force until the engine reaches its most efficient power range.
INSTALLATION:
MDC clutches should be mounted inboard (sprocket facing engine). For outboard mounting an optional spacer kit is required for the clutch to clear the side of the engine.
The crankshaft pto (power take off) of the engine is 3/4" diameter non tapered. The clutch is designed to have a slip fit installation over the crankshaft. A slip fit mounting must never be forced on otherwise removal may be very difficult. If the clutch will not slide easily onto the crankshaft it is necessary to polish burrs or nicks from the crankshaft or the inside of the clutch hub. A strip of fine grit Emery cloth should be used for deburring. Be careful as the keyway in the pto and the clutch have sharp edges. Always use eye protection and hand protection around sharp objects.
1. Slide clutch onto crankshaft.
2. Align keyway in clutch with the keyway in the crankshaft and insert special clutch key.
Note: Do not force key into the assembly.... a slight amount of filing to the key may be necessary in order to allow a slip fit.
3. Install the flat washer, lock washer, a bolt onto the end of the crankshaft.
4. Torque bolt firmly to 150 inch pounds.
NOTE: WARNING! An aluminum cover comes with each clutch. This cover is designed to protect the operator. Do not use the clutch without this cover secured in place with all fasteners.
STALL SPEED:
Stall speed is the RPM that the clutch hooks up solid. In kart racing stall speed is commonly called clutch slip. If someone asks "Where do I slip my clutch?" they want to know proper stall speed for their setup. Adjusting the clutch for more slip is actually raising the stall speed. Therefore adjusting the clutch for less slip is in fact lowering the stall speed. The best stall speed is the RPM that your motor reaches peak torque. If the clutch engages below peak torque, performance will be sluggish. Consequently if the clutch engages above peak torque power will be wasted in the form of heat in the clutch. Of course excess heat in the clutch should be avoided whenever possible as clutch damage will occur.
STALL SPEED GUIDELINES:
The stall speed recommendations below are for reference only. Finite adjustments must be made to adapt to track conditions, air density, engine setup, and etc.
Class Clutch Model Spring Choice Stall Speed
Restricted Stock MDC-444 (4 spr) 3400 RPM
Restricted Stock MDC-400S (6 spr) 3400 RPM
Stock MDC-444 (4 spr) 3800 RPM
Stock MDC-400S (6 spr) 3800 RPM
Super Stock MDC-444 (4 spr) 4000 RPM
Super Stock MDC-400S (6 spr) 4000 RPM
Modified MDC-400M (6 spr) 5000 RPM
An accurate tachometer is necessary to determine stall speed.
STALL SPEED ADJUSTMENT:
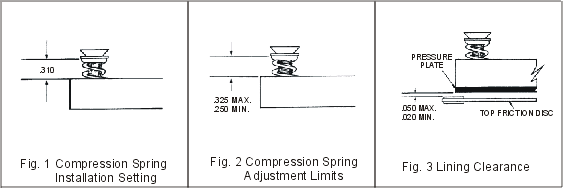
Be sure you have the correct springs installed for your class. Follow the chart above. Each MDC clutch is preset at the factory to engage lower than the optimum stall speed. This is done in order to prevent the clutch from overheating during break-in. The setting is .310" from the top of the spring to the top edge of the lever support. (Figure 1) Go onto the track with this setting and run 5 to 10 laps in order to seat the friction discs. During break-in you should be observing the stall speed to determine how much clutch adjustment is needed. After break-in return to your pit space and evaluate the changes if any which may be necessary.
TO RAISE STALL SPEED:
With an 1/8" allen wrench adjust all adjustment screws clockwise equally. 1/4 turn of adjustment will raise the stall speed about 100 rpm. Now go back onto the track and have someone check your performance with a stopwatch. Keep experimenting with stall speed adjustments until you have reached your fastest lap time. Now leave the stall speed alone and start testing gear selection and other performance variables.
TO LOWER STALL SPEED:
Use the same procedure as above except turn the adjusting screws counter-clockwise.
ADJUSTMENT LIMITS:
There are limits on the amount of adjusting that can be done before damage to the clutch occurs. (Figure 2)
Do not adjust the springs below .250" or they will coil bind (bottom out) before the clutch can hook up solid. This will cause the clutch to build heat from over slipping and eventually burn up. If the limit of.250" has been reached and you still want a higher stall speed, you need to install stiffer springs. There are three choices of springs listed in the parts list. For ultra high tension spring kits for modified please call a Horstman service technician.
Be careful not to exceed the maximum adjustment limit of .325" as the adjustment screws could work loose. (Figure 2)
INTERNAL CLEARANCE (AIR GAP):
Air gap is the distance of the space between the friction discs and the pressure plate. Correct air gap is important to enable the levers to pivot the prescribed amount for smooth yet firm engagement. (Figure 3)
Horstman assembles all MDC clutches at .030" air gap " .005" therefore you will not have to touch the clutch when new. During operation the friction discs will wear therefore it is important to check the air gap with a feeler gauge about every ten races. When the maximum clearance of .050" has been reached it is necessary to install new friction discs or a thicker floater disc to return the gap to within tolerance. A minimum air gap of .020" is the other end of the tolerance. Anything under .020" gap will cause a lazy performing clutch.
HELPFUL TIPS:
If the clutch is dirty, the plates will not slide freely on the splined drive hub. Clean the clutch after every dirt race and every five asphalt races.
The clutch can be cleaned while on the engine with an aerosol can of disc brake cleaner. First shut off engine and allow clutch to cool to ambient air temperature. Then aim the nozzle of the aerosol can toward the top edge of the clutch and squirt the cleaner into the clutch. Do not use solvents, gasoline, or soap and water to clean the clutch. Wear safety glasses to protect eyes when maintaining your clutch.
When starting engine be sure the driver has the brake engaged to prevent sudden acceleration. Always check stall speed on the racetrack, not in the pits or on a kart stand as this is not accurate.
CLUTCH DISASSEMBLY:
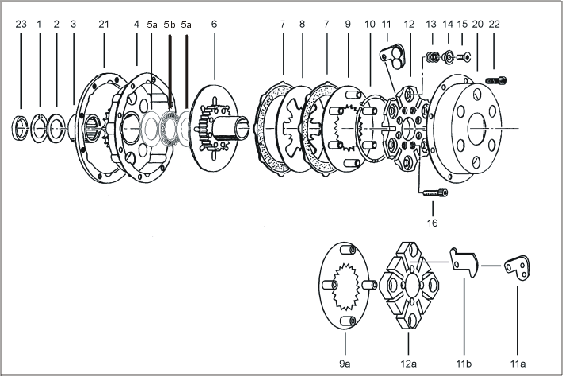
1. Remove Cover (Item 20).
2. Remove Snap Ring (Item 1).
3. Remove Outer Thrust Washer (Item 2).
4. Slide Drum (Item 4) off Hub (Item 6).
5. Remove Inner Thrust Washer (Item 5).
6. Remove Springs (Item 13).
7. Remove the eight Socket Head Cap Screws (Item 16).
8. Slide Lever Support Hub (Item 12).
9. Remove Friction Discs (Item 7) and Floater (Item 8).
MAINTENANCE AND REPAIR:
The MDC Clutch is subject to extreme heat and abuse due to the high slip racing conditions. The Clutch must be properly maintained for optimum performance. Remove Clutch and Inspect all components after each racing event on Modified Classes or five races for Stock Classes.
1. Spacer
Look for cracks or excessive wear. Replace if necessary.
2. Sprocket / Drum Assembly
Oiling the chain before each track session will increase the life of the sprocket. Replace drum when teeth are worn to a sharp point. Chain adjustment should have at least 12mm of free play. An over tight chain or chipped chain causes immediate sprocket wear.
3. Friction Disc
The friction disc has a hard steel core with special friction material bonded to the surface. Replace when friction material is glazed or worn below .115" thick.
4. Floater
Check for warpage or a polished surface. Replace as needed.
5. Pressure Plate
The pressure plate is precision ground on the surface that engages the Friction Disc. This surface should be checked periodically for warpage or a glazed condition. Replace or regrind if necessary. Replace also when the thickness is less the minimum thickness of .116". Also, check studs for cracks or loosening.
6. Drive Hub
Check for wear in the splined area that comes in contact with the floater. Check for cracks in keyway. Replace if cracked.
7. Levers
The pivot hole in the Lever is subject to stress due to frictional loading from centrifugal force. This causes the pivot hole to eventually elongate. Inspect the Levers for pivot hole wear whenever you rebuild the clutch. Replace when severely elongated.
8. Lever Guide Ring
Replace after 20-25 races.