|
L & T Kart Clutch Manual |
The L&T Kart Clutch is intended to be used for karting purposes only, racing or otherwise. To insure that it performs correctly at all times, it must be installed, adjusted and maintained properly. The following instructions will help you do just that. These directions are from the 3 disk 4 spring wet/oil clutch manual, but operation of clutch & manual can be applied to the other L&T clutches 2 & 4 cycle.
A. Principal of Operation
The L&T Kart Clutch is unique in its operation, as can be seen by studying Figure 1 because the centrifugal action on the weights pulls the clutch together rather than pressing the plated together as in a conventional cam clutch.
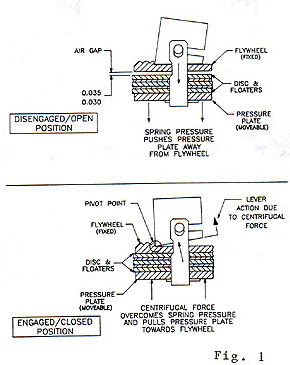
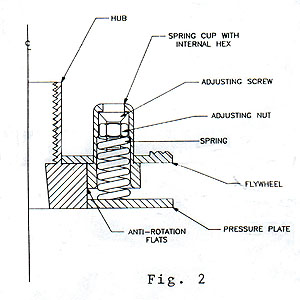
The spring arrangement in Figure 2 serves to provide the resistance necessary to get the correct stall speed by holding the clutch open until the weights overcome the spring pressure. By adjusting the spring pressure as shown in Figure 3, it is possible to get more or less RPM (slip) as needed.
1. Soak clutch in oil for at least one hour; overnight if possible. (WET CLUTCHES ONLY)
2. Hand lap clutch hub to crankshaft. This step is an absolute must. The correct lapping compound for this operation has been included with your clutch. Make sure the spark plug is in place to keep the crankshaft from turning. (Hold crankshaft with taper plier jaws if necessary). Apply a small
amount of compound to the taper on the crankshaft, then place the tapered hub over the end of the crankshaft and push and twist, first clockwise then counterclockwise, then lift, rotate the clutch and push and turn some more. Continue until both surfaces are 100% seated. After the lapping is completed,
clean up all traces of the compound from both surfaces.3. Check crankshaft key tolerance. Due to manufacturing tolerances it is possible that the crankshaft key may be too tall to allow the clutch hub to fully seat on the taper of the crankshaft. If you find this condition, file some material off of the top of the key until the clutch seats properly.
4. Install spacer onto crankshaft with chamfered side towards the engine.
5. Place some clutch oil on the drum bushing and slide the drum onto the crankshaft.
6. Install key into crankshaft.
7. Slide clutch onto the crankshaft, making sure that the hub keyway and friction disc ears are lined up correctly. The disc ears must be aligned with the small grooves in the drum.
8. Check and, if necessary, clean the threads on the crankshaft and starter nut. Using red loctite, install the starter nut and tighten to about 25 foot pounds. Use a 1" end wrench to hold the special installation nut to prevent the crankshaft from turning when tightening the starter nut.
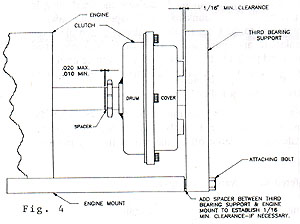
9. Check the side clearance between the sprocket and spacer (Figure 4). It is important that there be some clearance, too much is better than not enough. Grind the spacer if necessary, or replace it with another one of the correct size.
10. Place the reusable gasket on the oil cover, line up all the holes, put a bolt through the cover and gasket and position into place.
11. Insert the remaining five bolts and tighten all six bolts, no nuts are necessary as the drum has built-in threads.
12. Spin the cover and drum by hand. If any binding occurs repeat Step 9.
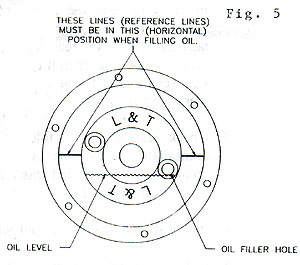
13. Remove one filter plug and fill clutch as per Figure 5 with L&T oil. When the oil is at the correct level, replace the plug.
14. Install the third bearing support and safety wire the bolt heads. Depending on the type of third bearing support, it may be necessary to cut or notch it to get at the filler plug. Check the clearance between the filler plug and third bearing support and add spacers if necessary (Figure 4).
15. Install chain and adjust tension.
C. Clutch Adjustment
1. Each clutch is preset with the springs at one turn of preload. This can be checked by inserting a 3/32(.093) Allen wrench into the spring adjusting screw and turning it clockwise until it feels "free" (neutral position). At the same time watch the movement of the nut through the holes in the spring
cup. Run the clutch at the one turn setting for 3 to 5 laps. If your kart is equipped with a tachometer, you may want to make an adjustment if necessary, after the breakin period to get the exact RPM needed.2. RPM (slip) adjustments (Figure 3)
Rotate filler plugs to 12 and 6 o'clock positions and remove upper filler plug. To get more slip, the spring preload must be increased. THIS IS DONE BY TURNING THE ADJUSTMENT SCREWS COUNTERCLOCKWISE.3. TO GET LESS SLIP, LOWER THE SPRING PRELOAD BY TURNING THE ADJUSTMENT
SCREWS CLOCKWISE.4. The maximum number of turns is three. Any more than that will damage the springs. A 1/2 turn will change the RPM by approximately 500 RPM.
D. Air Gap Clearance
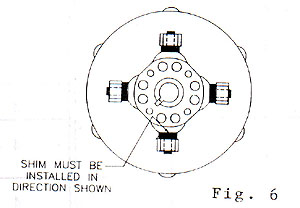
Each clutch is carefully inspected for the correct air gap clearance before it is sold. The correct clearance is 0.030 to 0.035. If the friction disc becomes worn and the air gap gets over 0.035, shims can be installed as per Figure 6 to maintain the correct air gap. To install the shim, squeeze the
flywheel and pressure plate together with a pair of pliers and slide the shim into place. Make sure that the head of the shim is towards the inside of the clutch, otherwise centrifugal force will pull them out of place. After inserting the shims in each lever strap, look at the weights and lever strap
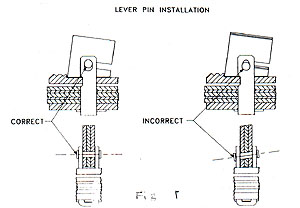
pins to make sure that they are in the right position. The weights must be against the lip of the flywheel and the pins must be all the way up into the lever strap hole (Figure 7).
E. Maintenance
During the day you may change the clutch oil as often as you want. You must change the oil when your day is over. It may be necessary to tip the kart on its side to get out all the old oil if the cover is not removed.Every time the kart is brought off the track:
1. Check the clutch oil level. See Figure 5
2. Lubricate the chain.Every other race day the clutch should be removed and inspected. A special tool is needed to take the clutch apart and to put it back together. This tool is available from the dealer that sold you your clutch.
Clutch inspection Procedure:
1. Check air gap.2. Check pressure plate for warpage, if only slightly warped it can be turned over and used again. If warpage exceeds 0.010, replace pressure plate.
3. Check for broken springs.
4. Check floaters for warpage.
5. Check friction disc. If they measure less than 0.085, they should be replaced.
6. Check lever pins for wear marks, grooves and chipped ends.
7. Check for wear on drum sprocket and bushing.